Want an aesthetic Instagram feed? It starts with defining your brand’s mood on a Pinterest board. Then, you capture photos with consistent lighting and colors. Finally, use a mobile app like Lightroom to apply a uniform editing style to all your images. Simple as that.
We’ve all been there: you spend hours getting a fantastic photo, write the perfect caption, and hit publish. But when you look at your Instagram profile, it feels chaotic. A bright, sunny photo sits next to a dark, moody one. A minimalist shot clashes with a busy, colorful one. The posts are great on their own, but together? It’s a visual mess that can confuse potential followers and hurt your brand’s credibility.
That’s exactly what happened to a client of mine, a talented jewelry maker. Her product shots were beautiful, yet her feed was a random collection of styles. Once we established a cohesive aesthetic—warm, delicate, and focused on natural light—her engagement and follower count grew because her profile finally told a clear, compelling visual story. Your feed can do the same.
What Exactly Is an Instagram Aesthetic?
So, what even is an Instagram aesthetic? It’s the curated visual theme that defines your profile’s overall look and feel. It’s more than just a filter; it’s the combination of your color palette, photo composition, editing style, and even the subjects you feature. Think of it as your brand’s visual identity. When a visitor lands on your profile, your aesthetic is the first impression they get, instantly communicating your brand’s personality—be it minimalist, vibrant, rustic, or modern.
A cohesive look makes your feed instantly recognizable. Followers should be able to see one of your posts in their timeline and know it’s yours without even looking at the username. This consistency builds brand recognition and trust, turning casual viewers into loyal followers who appreciate your unique style. It works.
How Do You Find Your Unique Visual Vibe?
Your unique visual vibe starts with defining the feeling you want to evoke. Before you even think about photos or filters, you have to understand your brand’s core personality. The goal is to translate abstract feelings into a concrete visual language.
Start with Words, Not Images
Grab a notebook and jot down 5–10 words you want people to associate with your brand. Are you aiming for ‘warm, cozy, and handmade’ or ‘sleek, modern, and bold’? Perhaps ‘adventurous, earthy, and natural’ is a better fit. These keywords become the foundation for every visual decision you make. I’ll be honest, don’t skip this step; it’s the compass that will guide your entire aesthetic.
Create a Mood Board on Pinterest
Once you have your keywords, head over to Pinterest and create a secret board. Start searching for images that embody those words. Crucially, do not just search for other Instagram feeds. Pull inspiration from interior design, travel photography, fashion, textures, and color palettes. For instance, if one of your words is ‘serene,’ you might pin photos of misty landscapes, minimalist architecture, and soft, neutral-colored fabrics. After pinning 30–50 images, review the board. You will start to see patterns emerge in lighting, color, and composition. This collection is your visual blueprint.

How to Take Photos That Fit Your Aesthetic
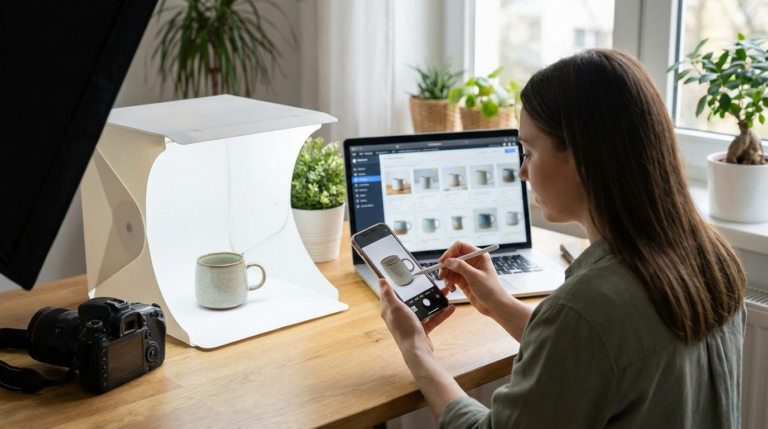
With your mood board as a guide, you can start capturing images that naturally fit your theme. Consistency during the photography stage makes the editing process so much easier. Plus, you don’t need a professional camera; your smartphone is a powerful tool when you use it intentionally.
Focus on these three elements during your shoots:
- Lighting: This is arguably the most important factor. Decide if you are a ‘bright and airy’ brand or a ‘dark and moody’ one. To achieve consistency, try to shoot in similar lighting conditions every time. For example, always shoot outdoors during the ‘golden hour’ (just after sunrise or before sunset) for that soft, warm light.
- Color Palette: Refer back to your mood board. Identify the 2-3 dominant colors that appear most often. Make an effort to include these colors in your photos, whether through clothing, props, or backgrounds. This doesn’t mean every photo must be monochromatic, but those core colors should be a recurring theme.
- Composition: How you frame your shots matters. Do you prefer clean, centered subjects (common in minimalist aesthetics) or dynamic, off-center compositions using the rule of thirds? Choose a compositional style and stick with it for a more unified look.
How to Edit Your Photos for a Cohesive Feed (On a Phone)
Consistent editing is the glue that holds your aesthetic together. This is where you transform good photos into on-brand content. You can do all your editing right on your phone using apps like Adobe Lightroom Mobile, which has a fantastic free version. You can also explore other options from our list of the best photo editing software for beginners.
Here is a simple, repeatable workflow I use in Lightroom Mobile:
- Create a Preset: Edit one photo until you love it. Adjust the light (exposure, contrast, highlights, shadows), color (temperature, vibrance), and detail (sharpening). Then, save those settings as a new preset. This will be your starting point for all other photos.
- Apply and Tweak: For each new picture, apply your saved preset. It will rarely look perfect right away, though. The next step is to make minor adjustments. A photo taken on a cloudy day will need more exposure than one taken in direct sun. Tweak the ‘Light’ and ‘White Balance’ settings until the photo matches the feel of your other edited images.
- Master the Color Mix Panel: This panel is a powerful tool. In the ‘Color’ tab, go to ‘Mix.’ Here, you can adjust the Hue, Saturation, and Luminance of individual colors. Imagine your aesthetic uses muted greens; you can select the green channel and lower its saturation. This allows you to fine-tune your color palette with precision. Many of the best AI photo editors are also adding features that make this process even faster.
Remember, the goal isn’t to make every photo look identical, but to make them feel like they belong to the same family. A preset gets you 80% of the way there; manual tweaking provides the final polish.

How Can You Plan Your Instagram Grid Layout?
Ever post a great photo only to see it clash with everything else on your grid? Planning your grid layout is the final step to ensuring a visually stunning feed. Posting a shot without seeing how it looks next to your other content can ruin the cohesive flow you’ve worked so hard to build. Use a grid planning app like Planoly, Later, or Preview to visualize your feed before you publish.
These tools let you upload your edited photos and drag-and-drop them into different arrangements. This helps you balance your grid effectively. For example, you can alternate between a detailed close-up and a wide, scenic shot to create visual rhythm. You can also ensure that pictures with similar dominant colors aren’t clumped together. You can arrange your next nine posts to create a pleasing checkerboard effect or ensure a smooth color transition across the grid. Trust me, this foresight is what separates amateur feeds from professional-looking ones.
Building an aesthetic Instagram feed isn’t about complex skills; it’s about a series of deliberate choices. It begins with defining your brand’s mood, continues with consistent photography, and is finalized with uniform editing. Your immediate next step is simple: open Pinterest and create a new, private mood board. Start pinning images that capture the feeling you want your brand to convey, and let that be the start of your visual journey.
FAQ
Do I need a professional camera for an aesthetic Instagram feed?
Absolutely not. Modern smartphones have powerful cameras capable of producing high-quality images. The key to a great-looking feed is consistency in lighting, composition, and editing, not expensive equipment.
What are the best free apps for editing Instagram photos?
For powerful, free editing, my top picks are Adobe Lightroom Mobile and Snapseed. Lightroom is fantastic for creating and managing presets for a consistent look, while Snapseed offers detailed manual control over specific areas of an image.
How often can I change my Instagram aesthetic?
Your aesthetic can evolve as your brand grows, but try to avoid frequent, drastic changes that can confuse your audience. A slow, gradual shift over a year or two is perfectly fine and shows natural brand development.
Should every photo on my feed use the exact same filter?
Not necessarily. The goal is a consistent style, not an identical look. Using a single preset as a starting point is a great strategy, but you’ll almost always need to make minor tweaks to exposure, contrast, and white balance for each photo to match the overall vibe.