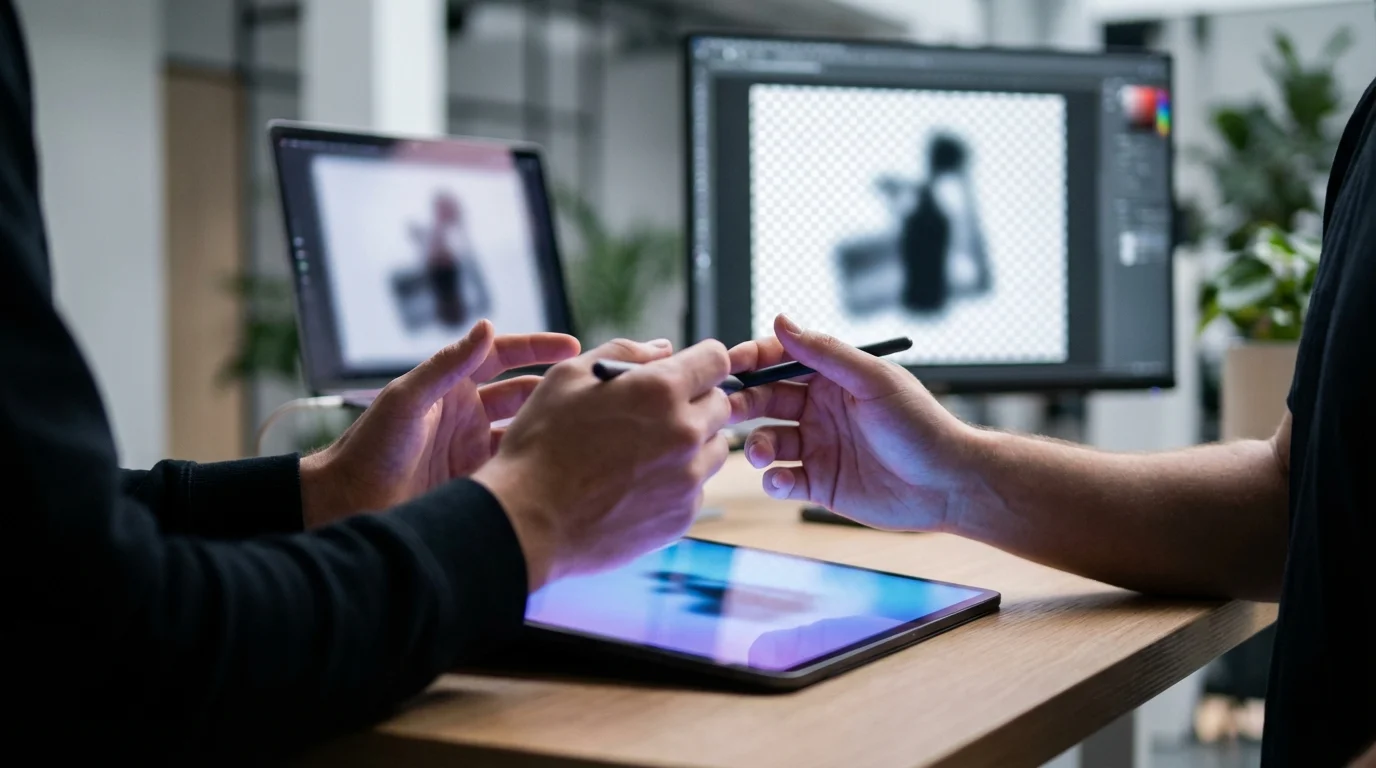
The fastest way to get a perfect white background for product photos? Use an AI-powered tool. It automatically removes the original background and swaps it with a pure white one (RGB 255, 255, 255). Honestly, this method is way faster and more reliable than messing with traditional studio setups. The result is a clean, professional visual that meets the standards of e-commerce giants like Amazon and Shopify.
We’ve all been there. You spend hours setting up a product shoot—buying the white paper roll, arranging lights, taking dozens of pictures. Yet, when you upload them, the background is a dull gray with distracting shadows, not that crisp, perfect white you see on major retail sites. It’s a common and frustrating roadblock. But here’s the good news: you don’t need a high-end studio or crazy photo editing skills to get a clean, consistent look. Modern solutions and simple techniques can deliver professional results fast, so you can focus on selling, not editing.
How do you achieve a pure white background in product photos?
So, how do you get that pure white background? You really have two options: nail it during the photoshoot (in-camera) or fix it in post-production. While getting it perfect in-camera sounds great, the post-production approach is far more practical and reliable for hitting the strict digital standards of e-commerce platforms.
The old-school studio method involves a white backdrop, a shooting table, and a complex lighting setup with multiple softboxes to kill shadows and overexpose the background. The idea is to light the backdrop separately and more brightly than the product itself. This requires a ton of space, expensive gear, and a deep understanding of lighting principles. Plus, even with a perfect setup, you’ll often find the background is still a light gray, not the required RGB(255, 255, 255) pure white.
In my experience, trying to get a perfect white background in-camera creates more problems than it solves. I’ve spent countless hours adjusting lights only to find I’ve created hazy, overexposed edges on my product. It’s maddening. The modern, efficient workflow is to focus on lighting the item perfectly against a simple, neutral backdrop and then let software handle the removal. This gives you a flawless result every time and saves hours of frustration. Simple as that.
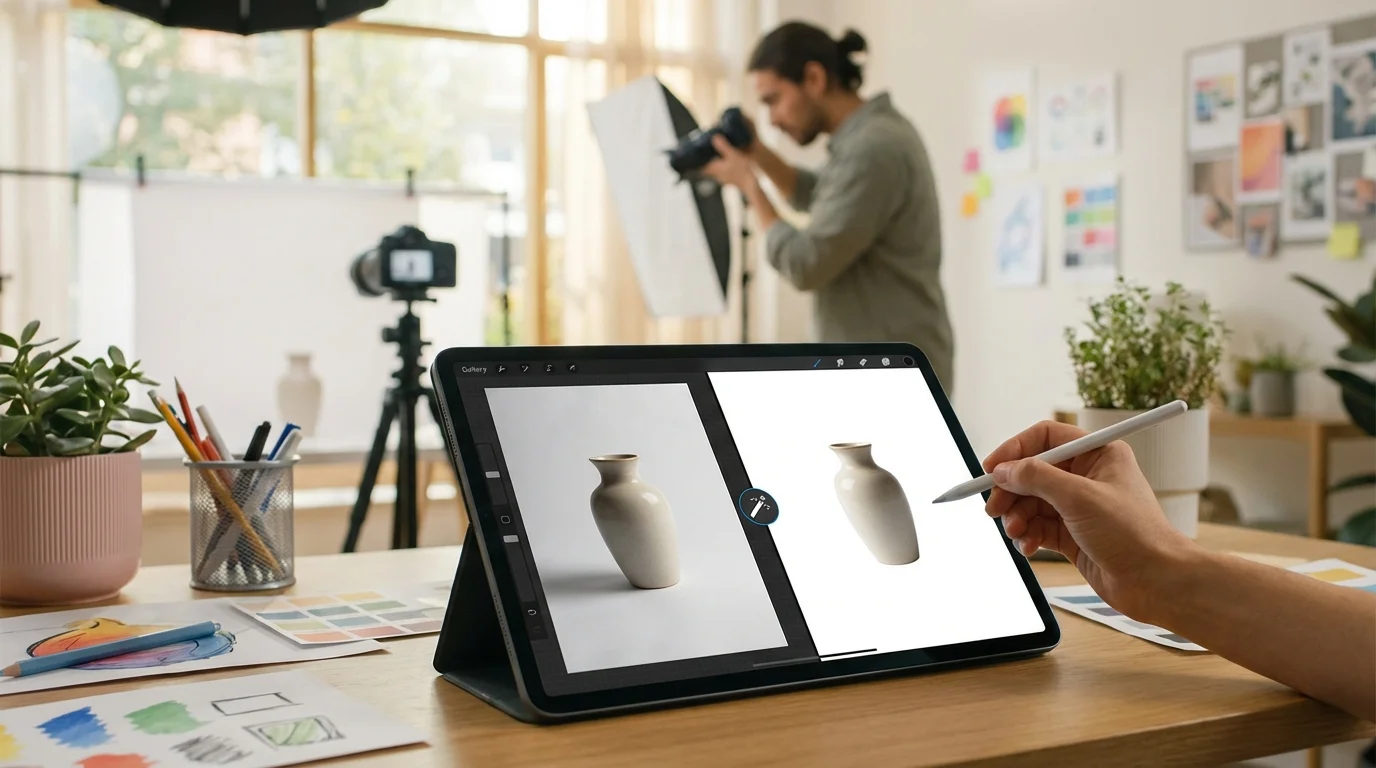
What are the top software tools for background removal in product photography?
When it comes to software for background removal, you’re basically looking at two main camps: powerful, all-in-one editors like Adobe Photoshop and fast, specialized AI options. The right choice really depends on your product’s complexity, how many images you’re processing, and your budget.
Adobe Photoshop remains the industry standard for high-end, manual background removal. Using the Pen Tool, an operator can create a precise, hand-drawn path around any product, ensuring a perfect cutout. Its ‘Select and Mask’ feature also helps refine tricky edges like hair or fabric. The main drawbacks are its steep learning curve and subscription cost. It’s overkill if you just need to remove backgrounds but is necessary for complex images or when pixel-perfect precision is required.
On the other hand, AI-powered background removal services have become incredibly effective. Solutions like remove.bg and integrated features within Canva can remove a background in seconds with a single click. There are also many free, browser-based options, like a simple background remover, that require no signup. These are ideal for sellers with hundreds of product shots, since they reduce editing time from hours to minutes. Imagine you have 50 new items to upload by Friday; this is where AI shines. Though they handle most objects perfectly, they can sometimes struggle with very fine details or transparent products. For a detailed comparison of design software, our guide on Canva vs Photoshop offers more insight.
| Feature | Adobe Photoshop | AI Background Remover |
|---|---|---|
| Speed | Slow (minutes to hours per image) | Extremely Fast (seconds per image) |
| Precision | Pixel-perfect, maximum control | Very high, but can miss fine details |
| Cost | Monthly subscription required | Free and paid options available |
| Best For | Complex products (jewelry, fur), final touch-ups | Bulk processing, simple to moderate products |
What equipment is essential for white background product photography?
You don’t need a Hollywood budget for this. The essential gear for a white background photography setup includes a camera, a tripod, a white backdrop, and at least two light sources with diffusers. You don’t need the most expensive equipment; consistency is way more important than brand names.
Your camera is the starting point. While a modern smartphone can capture great pictures, a DSLR or mirrorless camera gives you manual control over settings like aperture and ISO, which is crucial for consistent results. But regardless of your camera, a sturdy tripod is non-negotiable. It keeps your camera locked in the same position for every shot, ensuring all your products are framed identically and your images are sharp.
The backdrop is another key component. For small items like jewelry or cosmetics, a simple sheet of white poster board from a craft store works well. For larger products like clothing or electronics, a roll of white paper is the professional choice. The key is to create a smooth, clean surface with no visible texture or seams. Lighting is the most critical element. You need at least two lights, one on each side of the product, to provide even illumination and cancel out shadows. To get that soft, flattering look, you should use diffusers. Softboxes are the standard tool for this, as they create a large, soft light source that wraps around your product.
For example, I once worked with an Etsy seller who was struggling with dark, inconsistent photos of her handmade pottery, and sales were slow. We built a simple setup for under $200: two basic softbox lights, a roll of white paper, and a tripod for her existing camera. By creating a template for product placement and using the same camera settings for every piece, her entire store looked more professional and cohesive. The result? Within a month, her click-through rate from search results jumped by 30%, and sales followed suit.
How do automated solutions compare to manual methods for white backgrounds?
So, automated AI versus manual editing. Which is better? It’s really a trade-off between time and control. Automated solutions offer incredible speed and efficiency, making them perfect for high-volume e-commerce, while manual methods provide the ultimate precision needed for high-stakes ads and tricky products.
An automated tool can process hundreds of pictures in the time it takes a skilled artist to manually cut out one or two in Photoshop. For a Shopify store with a large catalog, this speed is a massive advantage. According to Shopify’s own product photography tips, getting merchandise online quickly is vital. AI tools make this possible by nearly eliminating the post-production bottleneck. Besides, the technology has advanced so much that for 95% of common e-commerce items—clothing, electronics, home goods—the AI result is indistinguishable from a manual cutout.
My professional workflow often blends both. I use an AI tool for the initial bulk processing and then manually refine the few hero shots or complex items in Photoshop. This hybrid approach combines the efficiency of automation with the control of manual editing, giving me speed for most visuals and precision where it really counts.
What common mistakes should be avoided when creating white background product photos?
Let’s talk about the most common mistakes I see. They usually involve lighting, background choice, and consistency. Avoiding them from the start saves hours of editing and makes your entire product line look professional and trustworthy.
The biggest mistake I see is harsh, direct lighting. Using a bare flash or a single bright lamp creates hard-edged shadows that are tough to remove and just look amateurish. The goal is always soft, diffused light. You want gentle shadows that define the product’s shape, not distracting dark blobs. Using two lights with large softboxes or even bouncing light off white walls or foam boards will solve this instantly.
Another frequent error is using an ‘almost white’ backdrop. A white wall or a bedsheet might seem white to our eyes, but a camera captures it as a shade of gray or cream. This makes post-production a nightmare because you have to separate the product from a background that isn’t uniform. A related issue is overexposing the background to try and force it white, which can cause light to spill onto the product, eroding its edges and making it look hazy.
A lack of consistency can also kill the professional feel of your store. If every product is shot from a slightly different angle, distance, and lighting setup, your category pages will look messy. This is where a tripod and marking the product’s position on your shooting surface are important. Maintaining visual consistency is just as important online as it is for your social media presence; it signals quality and attention to detail.
Getting that perfect white background isn’t some technical hurdle reserved for pro studios anymore. Between simple lighting setups and powerful AI software, anyone can produce clean, catalog-ready pictures. The best approach balances good in-camera technique with smart post-production. So, try this right now: find one of your product photos with a cluttered background and upload it to a free AI background removal tool. Seeing the instant result will tell you exactly which part of your workflow—shooting or editing—needs the most attention.
To expand semantic coverage and answer closely related search intent, also address terms such as “photoshop background removal product photography”, “AI background removal for product images” and “how to get pure white background product photos”.
For source-backed context and deeper verification, review these references: developers.google.com.
FAQ
How can I get a white background on my phone?
You can use mobile editing apps like Snapseed; its ‘Selective’ and ‘Brush’ tools can brighten the background to white. For a faster, one-click solution, though, dedicated background remover apps on the App Store or Google Play use AI to automatically cut out your subject.
What’s the difference between a transparent and a white background?
A transparent background, saved as a PNG file, has no background pixels at all. This allows you to place the product image on any color or design. A white background, typically a JPEG file, has a solid layer of white pixels behind the product.
Is a pure white background always best for product photos?
For main product listing images on platforms like Amazon or in a standard e-commerce catalog, a pure white background is the standard and often required. For social media, ads, and website banners, though, lifestyle photos with real-world backgrounds can be more engaging and help customers envision using the product.
How do I avoid reflections on glossy products?
To control reflections on shiny items like glass or metal, use large light diffusers (like softboxes or umbrellas) and adjust their position carefully. The goal is to create clean, simple reflections. You can also use black or white cards (called flags) just out of frame to block or add reflections strategically.
Remove image backgrounds with AI