WebP vs PNG for Transparent Images: Product Edge Test
Compare WebP and PNG for transparent product images with a local edge test, file sizes, and practical checks for clean catalog exports.

Contents
Use lossless WebP when a transparent product edge has to stay exact and the delivery path accepts WebP. Keep PNG when the handoff is uncertain or the asset needs broad legacy compatibility. Lossy WebP can cut weight further, but inspect fine dark outlines, glass, and soft shadows against the background where the product will actually sit.
Start with a native export copy
Before changing formats, make a copy in the editor you already have. On a Mac, Preview can export an image through File > Export and lets you choose a file type. Keep the original PNG untouched, export a test copy, then place both files on the same white, dark, and colored backgrounds. That comparison tells you more than a file-size number.
The native route is slow when you have a folder of cutouts, and it doesn’t give you a quick side-by-side WebP export. Once the source is safely parked, use PNG to WebP for a browser conversion, then compare the download with the original at the size your product card actually uses.
What transparency changes
PNG and WebP both carry an alpha channel, so either can show a product without a rectangular background. The important split is not “transparent or not.” It is whether the visible color pixels and the semi-transparent pixels around the object need to survive exactly.
Google’s WebP documentation says lossless WebP supports transparency, while its lossy mode can also retain alpha. Its published comparison says lossless WebP images were 26% smaller than PNGs, but that is an aggregate result, not a number to promise for your bottle, shoe, or logo. Google’s format overview is useful here because it separates the two encoding modes instead of treating WebP as one fixed setting.
For a hard-edged logo, a product with chrome, or a cutout that will move between backgrounds, I’d start with PNG or lossless WebP. A compressed edge can look fine on a white canvas and pick up a gray fringe on coral, navy, or a marketplace’s off-white card.
The local edge test
I created a 1600 x 1200 transparent product silhouette with a thin dark outline and a translucent glass panel, then encoded the same PNG with lossless WebP and with WebP at quality 82. I checked each result on a checkerboard. The test is deliberately small; it shows the decision, not a universal benchmark.
| File | Output size | Edge result |
|---|---|---|
| PNG source | 94,702 bytes | Sharp reference edge |
| Lossless WebP | 17,346 bytes | Sharp reference edge retained |
| WebP q82 | 23,146 bytes | Alpha retained; thin outline softened |
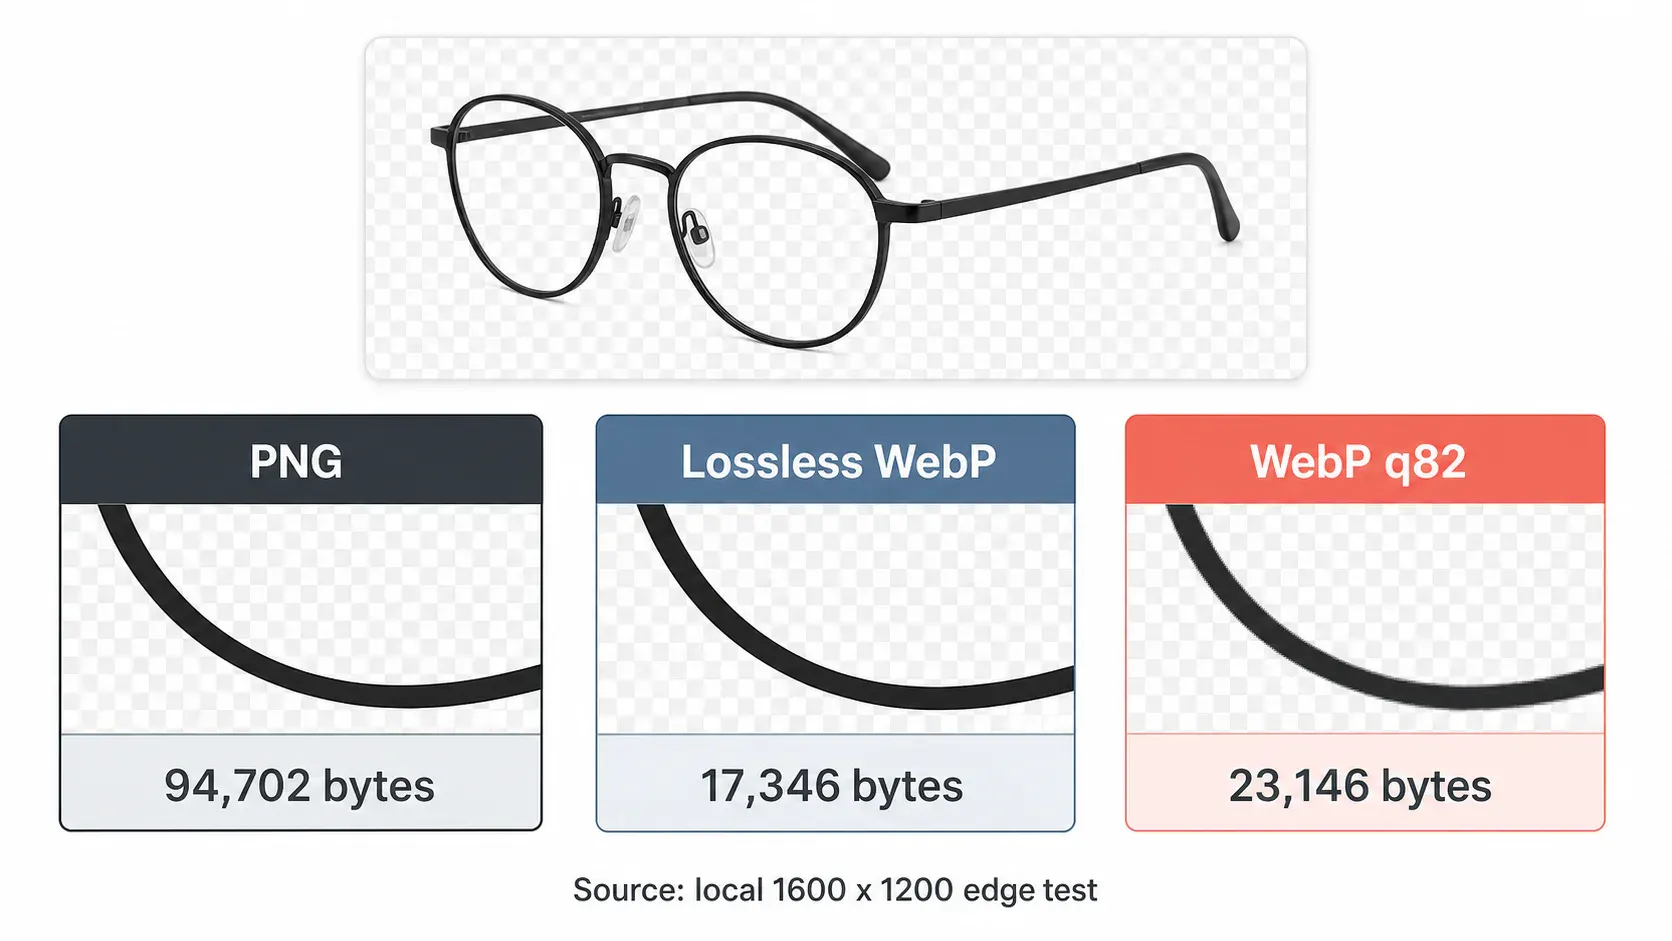
The surprising part was the ordering. Lossless WebP landed at 17,346 bytes, smaller than the 23,146-byte q82 export for this asset. That is why “lossy is always lighter” is a bad production rule. Source texture, transparent area, and encoder choices all matter.
Google’s cwebp reference says lossless mode can preserve transparent-area RGB only with its exact option. That invisible-color detail matters when an asset is later composited or re-edited, even though it does not show on the checkerboard today.
An edge check that catches the bad exports
Open the candidate file at 100%, then at the display size of the listing card. Look at the narrowest, highest-contrast part of the cutout first: a wire handle, eyeglass rim, hair-shaped edge, foil label, or the gap under a product cap. Do it against a dark swatch as well as white.
Three checks are enough (and they take less time than a re-upload):
- Put the asset on white. Look for a pale halo.
- Put it on a dark or saturated card. Look for a dirty outline or lost semi-transparent detail.
- Reduce it to the thumbnail width. Check whether the visual hierarchy still reads before you admire the zoomed-in pixels.
If the last check fails, change the format or export setting before you touch the crop. A safe crop cannot repair a softened alpha edge. For a related cleanup, see the transparent PNG import fix, which deals with the white-box failure that format conversion alone will not solve.
PNG versus lossless WebP
Choose PNG when another person must open the file in an unknown editor, when the upload brief explicitly requires PNG, or when you need a boring master file that travels everywhere. PNG remains a sensible working format for that reason. web.dev’s format guide makes the same practical distinction: use PNG or lossless WebP when fine detail has to stay at the highest resolution.
Choose lossless WebP for a web-bound transparent asset when you control the site or CMS and can verify the rendered output. It can be the better delivery file without being the better archive file. Keep the PNG source next to it; that’s the trade-off I prefer for catalog teams. If you’re still deciding where each format belongs, the format notes give the wider JPG, PNG, and WebP split.
Choose lossy WebP only after the edge check passes. It is a good fit for a large photographic cutout with forgiving shadows, but it trips up on crisp black marks, tiny type, and translucent material. If you also need to shave delivery weight after picking the correct dimensions, Araluma Compress belongs at the end of the workflow, not the beginning (after the visual decision).
A working product-image sequence
Start with the cleanest source, make the composition fit the card, and only then decide what the browser should download. That order avoids the usual mess where a huge PNG is converted three times while the product is still too small in the frame.
- Keep a PNG master after the cutout is approved.
- Export one lossless WebP candidate for the web card.
- Compare both at the exact card size on the real background color.
- Make a lossy WebP only if the weight matters and the edge survives.
- Name the final file for the product, not for the export experiment.
That last step has more value than it sounds. A product team can find matte-black-bottle-side.webp; nobody can confidently reuse final-final-3.png. The same restraint applies to any transparent file: preserve the approved master, then optimize the delivery copy. Don’t turn the delivery copy into the only source.
When the page, not the file, is the bottleneck
An image can be technically perfect and still be the wrong web asset if it ships far more pixels than the card displays. Responsive delivery and sensible dimensions matter alongside format choice. The page-speed image workflow covers that next layer.
For transparent product images, my recommendation is simple but not automatic: archive the PNG, deliver lossless WebP when you control the destination, and reserve lossy WebP for files that pass a real-background edge check. The 17,346-byte result above earned that choice; a different product may not.


