Shopify Product Image Formats Guide 2026: Stop Preconverting
Pick the right Shopify product-image master, avoid redundant WebP conversion, and keep product photos sharp within the platform's upload limits.

Contents
Shopify sellers usually don’t need to convert every product photo to WebP before upload. Shopify can choose WebP or AVIF for browsers that support them, so the smarter job is choosing a clean JPEG or PNG master, keeping the pixels sensible, and making a separate export only when the file will live outside that delivery path.
The Shopify delivery layer
Start in Shopify’s own media editor. It accepts JPEG, PNG, HEIC, and WebP, then creates different sizes for different parts of a theme and selects a format the visitor’s browser can handle. That means a product-photo master is not automatically the file a shopper downloads. The platform is already doing format negotiation at delivery.
That changes the default advice. I wouldn’t spend an afternoon converting a whole catalog of clean JPEG product shots to WebP just to upload them back into a store that can serve modern formats itself. Keep the original master and inspect the storefront first. If the product page is slow, the likely conversation is about pixel dimensions, image count, and theme behavior, not a ritual format swap.
For a file headed to an email campaign, a marketplace feed, or a page outside Shopify, Araluma Convert is useful because you control the delivered file. That is a different job from preparing a Shopify master.
The master-file decision
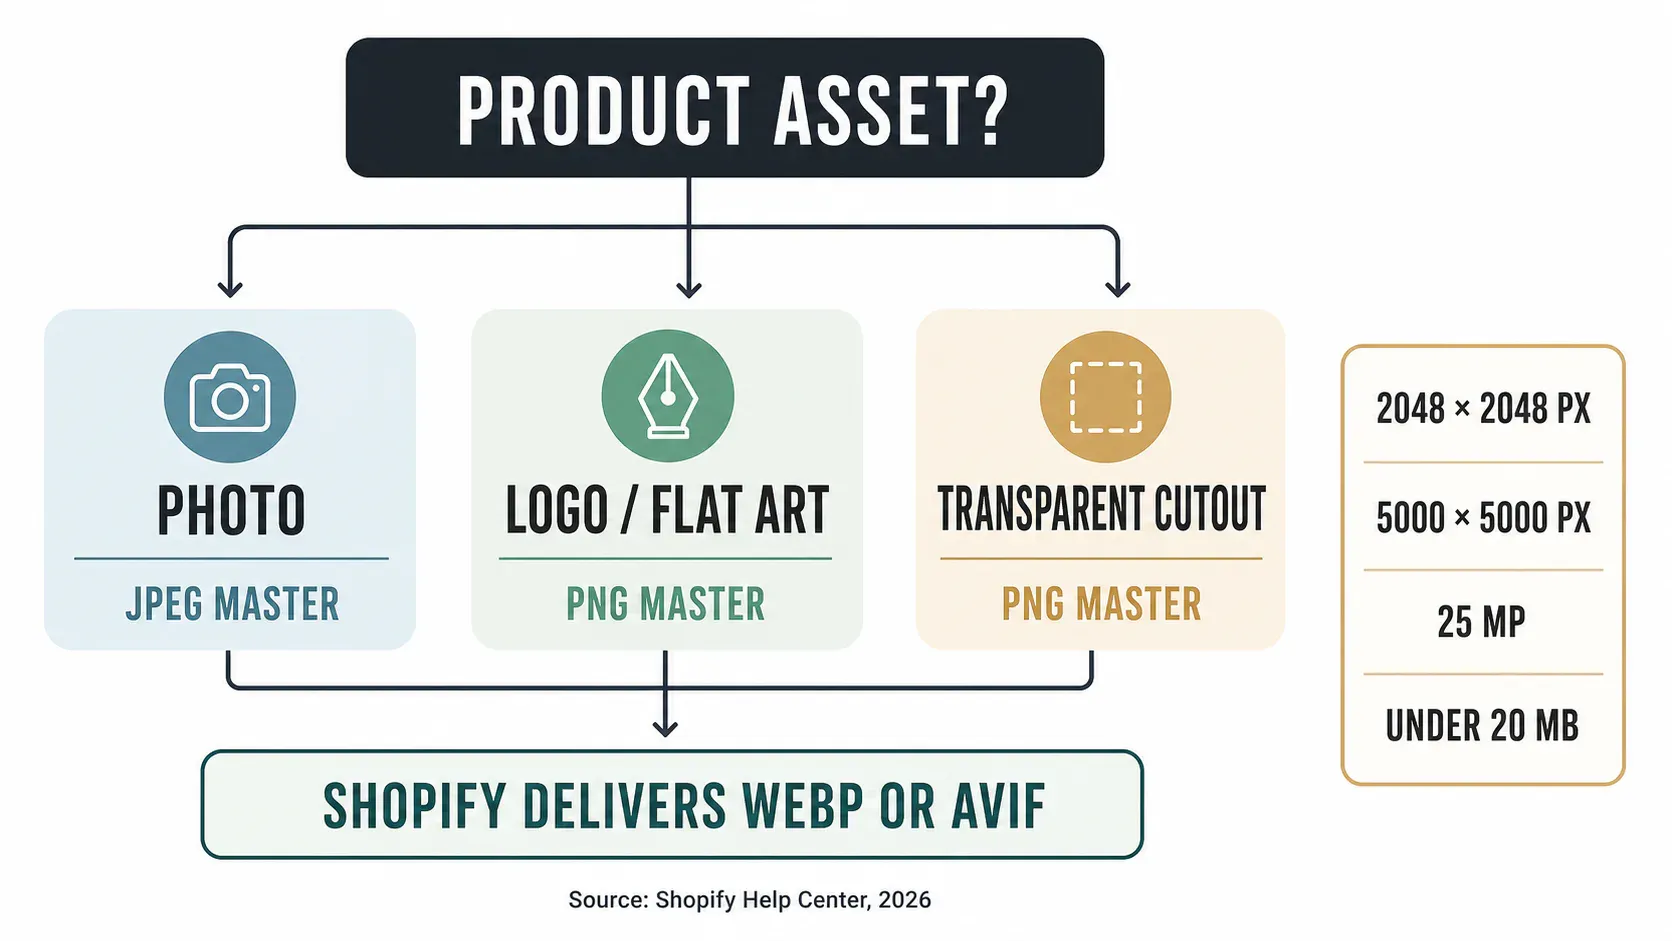
Use JPEG for ordinary product photography with lots of color and texture. Use PNG when the asset is a logo, a flat graphic, or needs transparency. Shopify’s documentation makes the same practical split: JPEG suits product images and PNG suits graphics and icons with flat color or transparent areas.
| What the asset contains | Keep as the master | Why |
|---|---|---|
| Product photo with texture | JPEG | Lossy compression is built for dense color and photographic detail. |
| Logo, badge, or line art | PNG | It protects hard edges and can retain transparency. |
| Product cutout with transparent edge | PNG | JPEG cannot carry an alpha channel. |
| Image needed outside Shopify | WebP copy, plus master | You control the file that another site or app receives. |
The trap is treating every asset as a photo. A size chart, a care badge, or a product image with tiny type has hard contrast boundaries. Lossy compression can rough those up, especially colored text against a flat background. Google’s image-performance guidance says the same thing more technically: lossy compression is less effective on sharp edges, line art, and text. Keep those assets as PNG or test lossless WebP before you replace anything.
There is a trade-off here. PNG can be the right visual master and still be a clumsy catalog upload if the artwork is enormous. Don’t flatten a transparent mark to JPEG just to chase a smaller number. First reduce its canvas to the size the theme can plausibly use, then see whether the byte count still matters.
Square product-image dimensions and upload ceilings
For a square product image, Shopify says 2048 x 2048 pixels usually displays best. Product and collection images can be as large as 5000 x 5000 pixels or 25 megapixels, but they must stay under 20 MB. Those are ceilings, not a recommendation to export every mug, T-shirt, and candle at the largest possible size.
Pixel count and file size are separate levers. A 5000 x 5000 image is 25 megapixels, while a 4000 x 4000 image is 16 megapixels. Shopify specifically calls out that a file under 20 MB can still be rejected when its megapixel count is too high. When an upload fails, check width and height before dragging the quality slider down.
If the source is a phone photo or a large studio export, use Araluma Resize before you compress it. That order preserves the useful pixels and avoids smearing fine fabric, stitching, or label detail just to make an oversized file behave.
The visual grid matters too. Shopify notes that collection pages look more consistent when featured images share an aspect ratio. I favor a square master for a mostly square catalog because it gives the product enough breathing room and makes the collection grid stop wobbling. A tall bottle or a wide wall print may need a different comp. Preserve the same ratio across the set rather than forcing every object into a square crop that cuts off its silhouette.
When a separate WebP export earns its place
WebP is still worth making when Shopify is not the final delivery system. A product image copied into a help center, a lightweight landing page, or a client handoff needs a file you control. In that situation, use WebP for a photographic export and keep the JPEG or PNG master beside it. The master is for revisions; the WebP is for a specific destination.
It also makes sense to create a WebP copy when you need to compare file weight before committing an asset to another system. Run a few representative images, not all 600 catalog files. One textured photo, one product cutout, and one graphic with type will tell you whether the savings are worth a new export step. If the type gets soft, stop there. The smaller file failed its actual job.
For a transparent product cutout, try the transparent PNG guide before flattening it. For an opaque product photo that is still heavy after resizing, use Araluma Compress and compare the product edge, label type, and color blocking at 100% before replacing the master.
A five-minute storefront check
Before changing a catalog, pick one product whose photo has texture, one with a transparent cutout, and one with a small badge or label. Upload the masters through Shopify, then open the product page and a collection page in a current desktop browser and on a phone. You are looking for a very ordinary thing: whether the item is clear at the size the theme actually gives it. A pin-sharp 5000-pixel source does not automatically improve a small collection tile.
Check the product photo at full detail. Zoom into stitching, a grain pattern, or a glossy edge. Then look at the collection card, where a smaller variant is likely doing the real work. Shopify says it creates different image sizes for different theme areas, which is why a single export can look generous on a product page and merely adequate in the grid. That isn’t a format failure. It’s a layout decision.
Next, check the graphic asset. A logo with a transparent edge should sit cleanly against both a light and a dark section of the theme. A care label or size chart should keep its thin strokes legible. If it doesn’t, return to the PNG master before you start testing compression settings. The file type is only one part of the comp (the crop and the background color have just as much to say).
Keep a short note with the original filename, dimensions, format, and the page you inspected. This is enough to make the next catalog update repeatable. It also stops a common cleanup mistake: treating a collection-page crop, a product-page zoom image, and an email attachment as if they need the same source file.
Use the same three files when you change a theme. A new theme can alter the crop behavior, the whitespace around a product, or the prominence of collection cards, so a catalog that looked balanced last season may need a fresh look. Don’t re-export first. Open the pages, find the visual failure, and change the master only when the failure follows the asset rather than the layout (a much cheaper distinction to make).
Where format changes actually help
There are three situations where changing the format is worth the extra step. First, the image leaves Shopify. A WebP copy can be the practical delivery file for a documentation page or a lightweight campaign asset because the store is no longer choosing a compatible format on your behalf. Second, the source asset is wrong for its content. A JPEG logo with a baked-in white box needs a transparent master, while a huge PNG photo may be carrying more file weight than the photo needs.
Third, the upload fails. Shopify’s two limits make the diagnosis unusually clean: a product image must be under 20 MB and within the platform’s pixel limits. A smaller byte count doesn’t cure a 25-megapixel problem. Check the dimensions first, reduce them if needed, and only then compare a more compact export. That sequence is slower for one file and faster for a catalog because it gives you a rule you can repeat.
Avoid format conversion when the only evidence is an extension in a browser tab. Shopify may serve a modern format to that browser even when you uploaded a JPEG or PNG master. The server’s delivery choice is proof that the delivery layer worked, not proof that the original catalog needs to be rebuilt.
That is why I keep the catalog folder boring: one editable master, a clear filename, and destination-specific copies only when a destination demands them. The next product launch goes faster when you can find the clean source, crop it for the grid, and export the one file that actually needs to travel.
A clean catalog workflow
- Export a JPEG master for normal product photography, or a PNG master for a transparent or flat graphic asset.
- Set the intended aspect ratio before upload. Use a consistent square comp when the collection grid needs it.
- Keep square product images near 2048 x 2048 pixels unless the product or theme has a specific reason to need more detail.
- Upload the master to Shopify and inspect the product page plus a collection page on a phone and a desktop browser.
- Make a separate WebP only for files that will bypass Shopify’s delivery layer, then retain the original master for the next crop or edit.
This workflow is less glamorous than a bulk conversion button, but it keeps the product shot, the visual hierarchy, and the editable source intact. If you are also preparing marketplace listings, the Etsy resize workflow is a useful separate pass because a marketplace upload is not the same delivery system as a Shopify theme.
The recommendation
Keep JPEG masters for product photography and PNG masters for graphics or transparent cutouts. Let Shopify handle compatible browser delivery, then create WebP only for destinations where you own the final file. If an upload still trips a limit, use the 200 KB image guide for the pixel-first diagnosis and check the web-speed image checklist before rebuilding the whole catalog.


