Amazon Main Image: Why Your White Background Isn't White
Amazon's main image wants RGB 255,255,255. A real studio shot measures 250,248,249, and the JPEG save adds a grey halo of its own. Sample it, then fix it.

Contents
Amazon’s main-image rule is a pixel value, not a look. The spec asks for RGB 255,255,255, and a studio shot that reads white to your eye can measure 250,248,249 with only a third of the frame actually pure. Sample the background first, fix the white point second, and control the save last. The order matters more than the tool.
What the spec actually says
Amazon’s own seller guidance is specific where forum advice is vague. It asks for the shot to be taken against a white background, then gives the number in parentheses: RGB 255, 255, 255. The file has to sit between 500 and 10,000 pixels on its longest side, and clearing 1,000 pixels per side is what unlocks the zoom viewer buyers use to inspect texture. Amazon’s seller documentation lists JPEG, TIFF, PNG and non-animated GIF as acceptable, with JPEG stated as the preference.
| Spec | Value |
|---|---|
| Main-image background | RGB 255, 255, 255 |
| Longest side | 500 to 10,000 px |
| Zoom threshold | over 1,000 px per side |
| Accepted formats | JPEG, TIFF, PNG, non-animated GIF |
| Product fill | 85% or more of the frame |
When the check fails, the notice names the mechanism rather than the aesthetic. A seller who posted theirs to the European forum after a week of suppression got the phrase “non-pure white background”, which is the automated system telling you it sampled pixels and did the arithmetic. Off-white doesn’t qualify, and neither does close enough. The listing stays out of search until the numbers change.
Sample the background before you edit anything
Your computer already ships the tools for both halves of this. On a Mac, Photos has a levels panel under Adjust > Levels whose white point Apple describes as the control that “adjusts the point at which white areas are completely white”, with a histogram you can switch from Luminance to RGB. On Windows, Paint’s colour picker plus the colour editor reports the RGB triple of whatever pixel you click. Both come with the same weakness: one click tells you about one pixel, and the white point slider lifts the product’s highlights along with the background.
That weakness is the whole problem. I measured a real commercial studio shot of a black pump on a white sweep, a 2,500 x 1,656 JPEG published by the shop that sold the shoe. The median pixel in a 24-pixel border frame came back at 250, 248, 249. Only 31.9% of the frame was exactly 255,255,255, and the darkest pixel in that border read 201. A second file from the same shoot, same studio, same day, measured 216, 212, 211 with not one pure-white pixel anywhere in the frame.
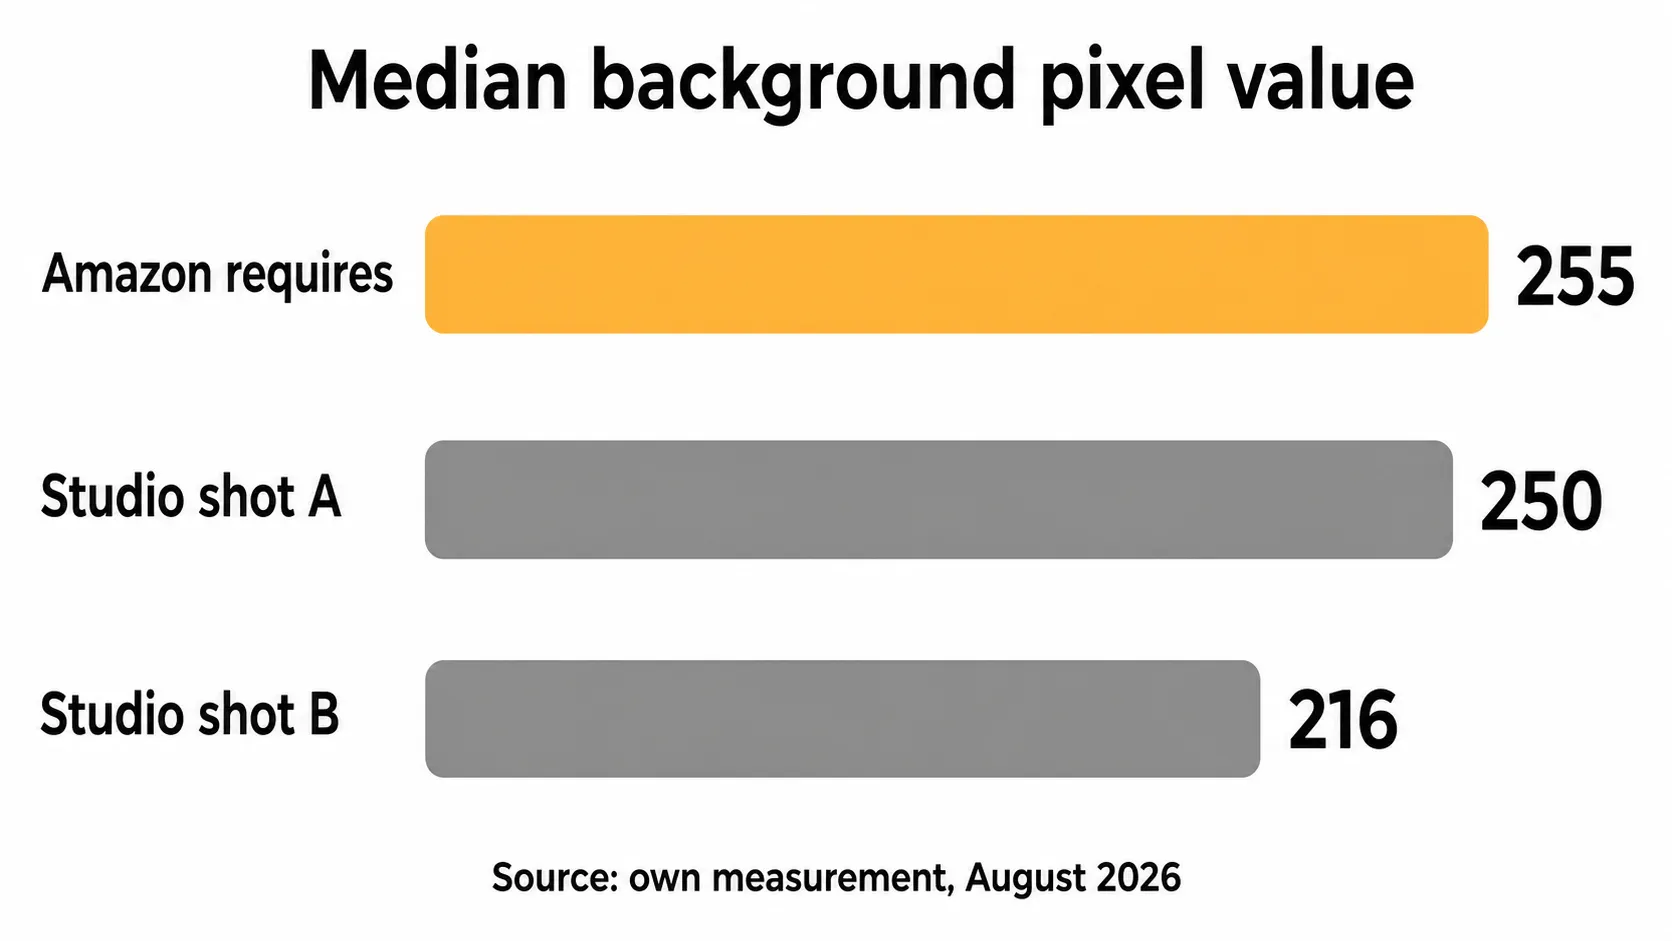
So the picker in the top-left corner reports that the corner is fine while the darkest patch of that same sweep sits 54 points below white. If your sample comes back anywhere below 255 you’re not adjusting brightness, you’re replacing the background, and a background remover gives you a cutout you can drop onto a canvas you control. Photoshop’s magic wand and a white fill do the same thing by hand; remove.bg and Photoroom sell the automated version. All of them beat sliding Exposure until the shadows blow out.
Where the grey halo comes from
Here’s the part nobody measures. I took that same file, forced every pixel at or above 245 up to a clean 255 (46.6% of the frame now pure white), and re-saved it. Then I re-measured the 1,481,202 pure-white pixels sitting within 30 px of the product’s edge.
| Save | File size | Edge pixels no longer 255 | Darkest stray pixel |
|---|---|---|---|
| JPEG q95 | 638 KB | 1.3% | 223 |
| JPEG q90 | 504 KB | 1.5% | 212 |
| JPEG q80 | 329 KB | 1.7% | 212 |
| JPEG q70 | 267 KB | 1.6% | 199 |
| PNG | 2,073 KB | 0.0% | none |
A file that left my editor with a mathematically pure background came back with a grey ring around the shoe, and at quality 90 the darkest pixel in that ring reads 212. You will not see it at 100% zoom. A pixel sampler will.
The mechanism is documented, not mysterious. MDN’s format guide describes JPEG as lossy compression “based on the discrete cosine transform” and warns that “applying lossy compression to content requiring sharpness, like diagrams or charts, can produce unsatisfactory results”. A hard product edge against flat white is precisely that kind of content. PNG, being lossless, returned every pixel I gave it, and charged 2,073 KB against JPEG’s 504 KB for the identical image. Four times the weight to protect a ring of pixels nobody can see. That is a real trade, and for most products it’s the wrong one.
Where it flips: fur, hair, glass, mesh, anything with a soft or translucent edge. Those edges already fight the cutout, and the same fringing shows up when sellers fix rejected marketplace edges after the fact. Ship those as PNG and accept the megabytes.
The 85% rule has no ruler
Amazon publishes the fill requirement in two places with two different numbers. The seller guidance says “Have the product fill 85% or more of the frame”. The Amazon Ads guide says “your product fills at least 80% of the image area” and ties the 1,000-pixel minimum to the zoom function.
Neither page says how to measure it. On my test file the product’s bounding box covers 87.3% of the frame if the soft contact shadow counts as product, and 56.9% if it doesn’t. Same photograph, same shoe, a 30-point swing decided by where you draw the line. My rule: measure the long edge instead of the area, leave roughly 5% of breathing room on the tightest side (which also stops the mark from looking cramped once it shrinks), and stop optimising. The same framing logic that governs a thumbnail crop applies here, because the thumbnail is what most shoppers actually see.
A save order that survives the check
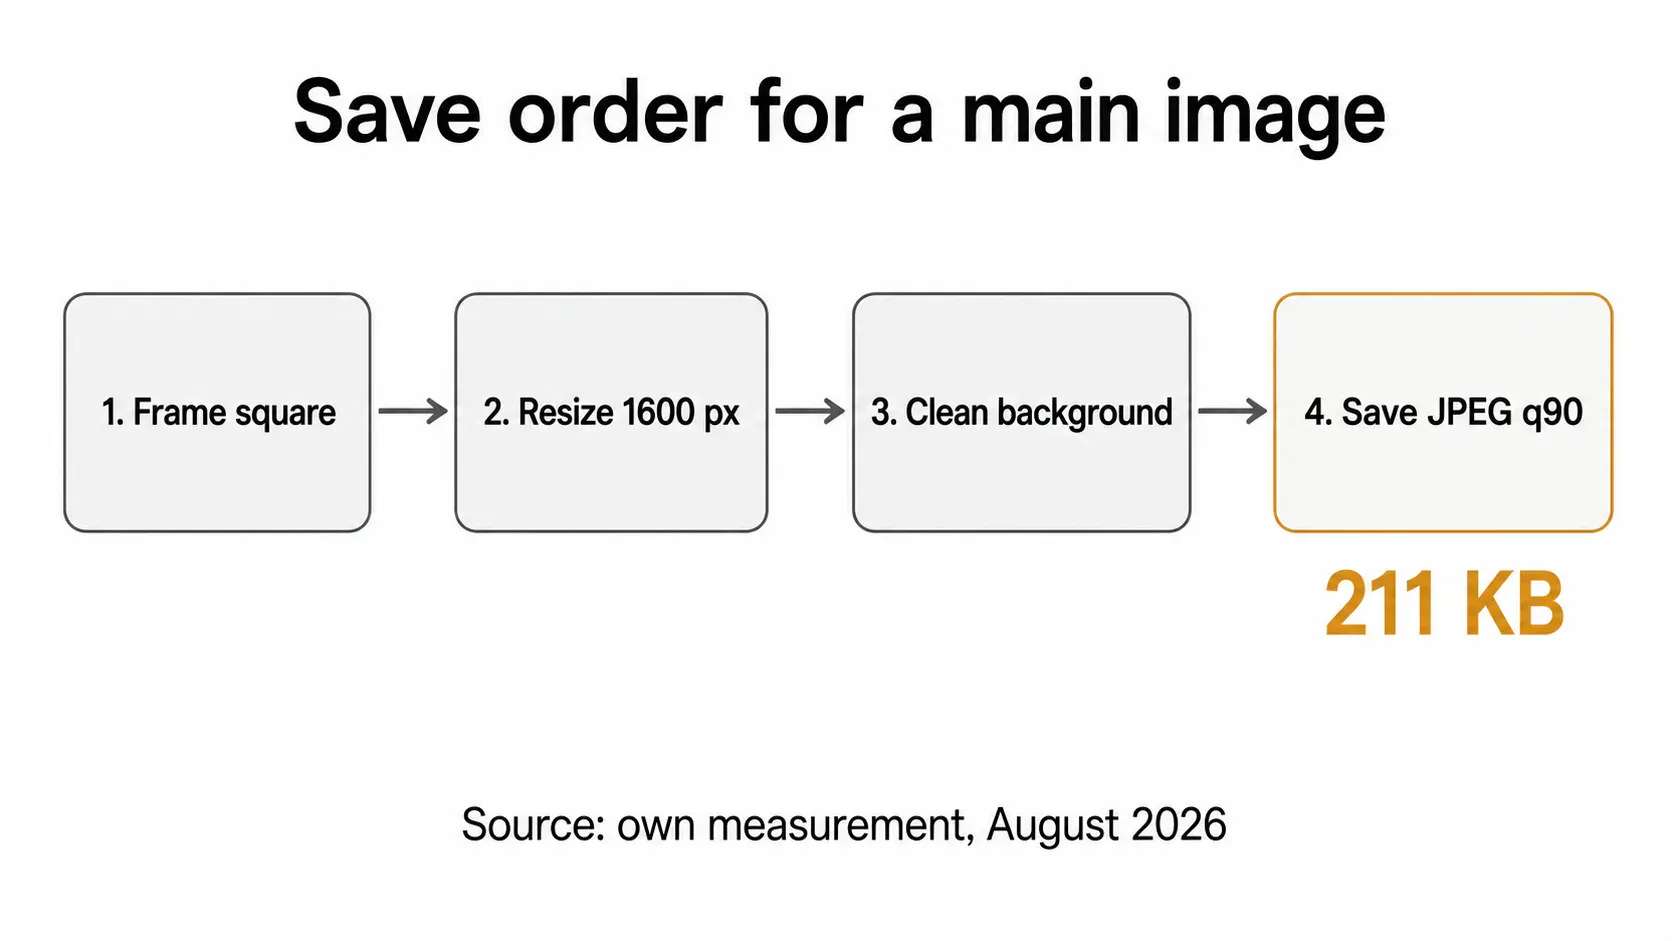
Sequence beats software. Do it in this order and the pixels stay where you put them:
- Frame first. Frame the product on a square canvas before anything else, so the fill percentage stops moving after you’ve fixed the colour.
- Resize second. Resize to 1,600 px on the long edge. That clears the 1,000 px zoom threshold with margin, and resampling a large file down is kinder to edges than pushing a small one up.
- Clean the background third. Cut out or clamp the white point after the resize, never before. Resampling my clamped file cost another 0.2 to 0.4 percentage points of pure white on its own.
- Save last. Quality 90 landed at 211 KB at 1,600 px in my run; 1,000 px came in at 86 KB and 2,000 px at 315 KB.
If the file still lands heavier than your workflow likes, push weight down with Araluma Compress rather than by dropping the JPEG quality into the 70s, where the stray pixel in my measurement fell to 199. The same discipline that gets a photo to a target size works here, with one extra constraint: the background has to survive it.
Two failure modes worth naming before you upload. Saving the cutout as a transparent PNG and letting the platform flatten it is how transparency turns black instead of white, so flatten it yourself onto white. And a background that started at 216, like the second file I measured, will not survive a levels nudge without eating the product’s own light edges. That is a reshoot, or a cutout, the same call you face with Shopify listing backgrounds and with any catalogue built from photos shot under mixed light.
What to check before you hit upload
- Background sample from three points, not one: two corners and one spot beside the product, all reading 255,255,255.
- Long edge at pixel dimensions you typed in rather than dragged to, above 1,000 px and ideally 1,600.
- Saved at quality 90 or higher, or as PNG when the edge is soft.
- Product filling the frame by the long edge, with the shadow decision made deliberately rather than by accident.
Where this breaks down
A product that is itself white or near-white defeats every step above. Push the background to 255 and the product’s own highlights go with it, and the shape dissolves into the sweep. Those shots need a shadow, a reflection, or a faint grey gradient the check still reads as white, which is a lighting call made at the shoot and not a fix available in a save dialog. If you sell white ceramics, budget the studio day. Then sample three background pixels on the first frame off the camera, while the set is still up and reshooting costs you ten minutes instead of a week.


