How to Resize an Image to Exact Pixel Dimensions
Resize an image to exact pixel dimensions without stretching it: choose fit, fill, or crop, then export a clean file.

Contents
To resize an image to exact pixel dimensions, first decide whether the whole photo must remain visible, the frame must be filled, or the image can be cropped. Then enter the target width and height with proportions locked for a proportional resize, or crop first when the target ratio differs. Typing two numbers blindly is how faces get wide and product labels get squashed.
The four-question pixel preflight
Start with the delivery slot, not the original file. Is the target fixed at 1080 × 1350? Must every part of the photo survive? Is there room to crop the sides or top? And is this one export or a folder of them? Those answers pick the method before any slider does.
For a 4032 × 3024 photo, the original ratio is 4:3. A 1080 × 1350 target is 4:5. You cannot preserve every pixel of that photo and fill that vertical frame without either cropping or distorting it. It’s geometry, not a bad export setting.
If the target is flexible, keep proportions locked and set just one dimension. If the target is a hard delivery requirement, decide which loss you can live with: whitespace, cropped edges, or a stretched subject. I’d take whitespace or a deliberate crop every time. Stretch makes a logo look cheap before anyone reads it.
Native resizing for one image
For a single file, use the software already on the machine before opening another tab. On a Mac, Preview lets you enter width and height or select a size; with Scale proportionally on, changing one dimension updates the other. Apple also notes that you can select several files in Preview’s sidebar and use Tools > Adjust Size for a small batch. Apple’s Preview guide documents both paths.
That native route is fast, but it has one catch: an exact 1080 × 1350 canvas is not the same job as a proportional resize from a 4:3 original. Preview will protect the ratio when you ask it to, which is right for a product shot that must stay intact. It will not invent the missing 4:5 framing decision for you.
On Windows, PowerToys Image Resizer is the more practical native-adjacent option once you have a batch. Microsoft documents right-click resizing from File Explorer and lets you choose pixels, percent, or other units. It also names the three modes cleanly: Microsoft’s Image Resizer documentation says Fit preserves the whole image, Fill preserves proportions but crops, and Stretch fills the box by distorting the image.
Fit, fill, and stretch in a real frame
Fit is the safe option when the subject cannot lose an edge. A 4032 × 3024 photo fitted inside 1080 × 1350 becomes 1080 × 810, leaving 270 pixels of vertical space in the frame. That gap is useful for an email layout or a card with a background color; it is awkward when the platform crops the card itself (which is the problem most exports hide).
Fill is the choice for a hard frame where the visual hierarchy matters more than the far edges. The same 4:3 photo scaled to fill 1080 × 1350 reaches 1800 × 1350 before the side crop. That means 720 pixels disappear across the width, or 360 pixels from each side if the crop is centered. Move the crop window before you commit: a coffee mug’s handle and a product’s corner are usually the first casualties.
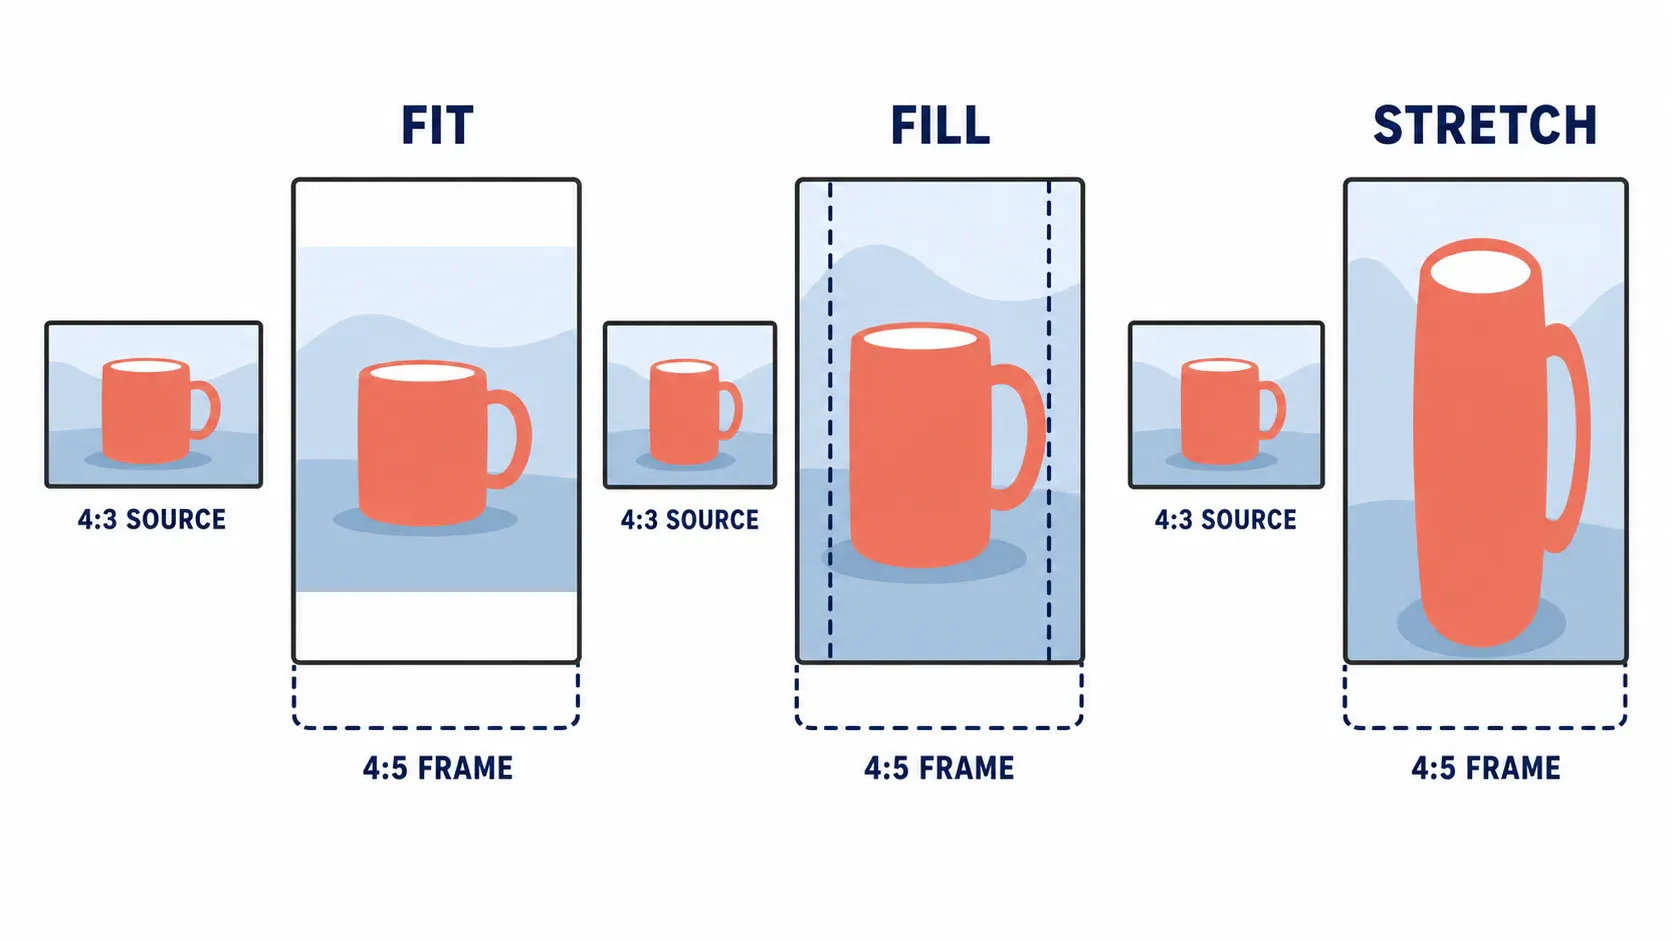
Stretch hits 1080 × 1350 with no crop and no blank space. It also turns circles into ovals. PowerToys explicitly describes it as disproportionate scaling, and Adobe makes the underlying control plain: unlinking constrained proportions allows width and height to change independently. Adobe’s resizing reference is useful here because it separates that decision from resampling, which changes the total pixel count.
Exact pixels in a browser workflow
When you need a fixed export but do not want to install PowerToys or open a heavyweight editor, use resize image after the native check. Enter the requested width and height, keep the aspect-ratio lock on when the photo should remain whole, and inspect the preview before downloading.
For a 1080 × 1350 social post from a 4:3 source, use Araluma Crop Image first. Set the 4:5 composition, move the focal point into the safe middle, then resize the cropped result to 1080 × 1350. This two-step sequence is slower than stretching, but it nails the part a template can’t judge: whether the subject still has breathing room at the fold.
If the image is already the right shape and only too heavy, leave its dimensions alone and use Araluma Compress. Resizing and compression solve different problems. The first changes the grid; the second changes the bytes.
The errors that make an exact export wrong
The most common mistake is treating width and height as independent instructions when the target has a different ratio from the source. You get the requested numbers, but the photo has been pulled out of shape. Adobe’s documentation calls out constrained proportions for precisely this reason.
The second mistake is using a percentage when a platform specifies pixels. A 50% export from 4032 × 3024 becomes 2016 × 1512, not 1080 × 1350. Percentages are great when you want a uniformly smaller version; see the percentage guide when the target is relative rather than fixed.
Finally, do not keep resaving the same JPEG while adjusting the crop by a few pixels. Make the crop and dimension decision on the best original, then export once. For product listings, that protects detail far better than trying to repair a softened file later; the Etsy listing resize guide shows how safe framing affects the listing thumbnail. For a horizontal target, the 4:3 crop workflow is the useful companion.
A two-minute export check
Open the exported file’s properties and verify both numbers, in that order: width first, height second. Then check it at the size the destination will actually show. Don’t judge it only at 100% zoom. A 1080 × 1350 image can still look wrong if the product is pressed against the top edge or the type has no gutter (a useful, boring check).
For a website image, follow the web image optimization checklist after the pixel check. For a fixed social frame, stop when the crop is right. More resizing cannot improve a composition that already lost its subject.


